Easter is a time of celebration, renewal, and joy, making it the perfect occasion for crafting festive amigurumi. Creating Easter-themed amigurumi, such as bunnies and decorated eggs, is a delightful way to add a handmade touch to your holiday decorations or to give as thoughtful gifts. This guide will walk you through the steps to make adorable Easter amigurumi, from selecting materials to completing your finished pieces.
Materials Needed
- Yarn: Soft pastel colors (white, pink, yellow, lavender, mint green) for bunnies and eggs.
- Crochet Hook: Appropriate size for your chosen yarn.
- Fiberfill Stuffing: For filling the bunnies and eggs.
- Safety Eyes or Embroidery Floss: For facial features.
- Yarn Needle: For sewing parts together and weaving in ends.
- Scissors: For cutting yarn.
- Stitch Markers: To keep track of your rounds.
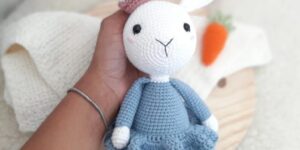
Bunny Amigurumi Tutorial
Head
- Magic Ring: Using white or pastel-colored yarn, create a magic ring and crochet six single crochets (sc) into the ring.
- Increase: Increase in each stitch around (12 sc). Continue increasing in each round until you reach a total of 36 stitches.
- Shape the Head: Crochet several rounds without increasing to shape the head. Insert safety eyes or embroider eyes with black yarn.
- Finish the Head: Begin decreasing rounds to close the head, stuffing it firmly as you go. Fasten off and weave in the ends.
Body
- Magic Ring: Start with white or matching yarn and create a magic ring with six single crochets (sc).
- Increase: Increase in each stitch around until you reach a total of 42 stitches.
- Shape the Body: Crochet in rounds to form a cylindrical shape for the body.
- Stuff and Close: Stuff the body firmly and begin decreasing rounds to close it. Fasten off and weave in the ends.
Ears
- Magic Ring: Using white or pastel yarn, create a magic ring and crochet six single crochets (sc).
- Shape the Ears: Crochet in rounds, increasing and then decreasing to form an ear shape. Make another ear in the same manner.
Legs and Arms
- Magic Ring: Using matching yarn, create a magic ring and crochet six single crochets (sc).
- Shape the Limbs: Increase rounds until you reach a total of 18 stitches. Crochet in rounds to form the limbs.
- Stuff and Finish: Stuff the limbs lightly and close them. Make all four limbs in the same manner.
Tail
- Magic Ring: Using a small amount of white yarn, create a magic ring and crochet a small sphere for the tail.
Assembly
- Attach Head to Body: Sew the head to the body using a yarn needle and matching yarn.
- Attach Limbs: Sew the arms and legs to the body, ensuring they are evenly spaced.
- Attach Ears: Sew the ears to the top of the head.
- Attach Tail: Sew the tail to the back of the body.
Decorated Egg Amigurumi Tutorial
Egg Base
- Magic Ring: Using pastel-colored yarn, create a magic ring and crochet six single crochets (sc) into the ring.
- Increase: Increase in each stitch around (12 sc). Continue increasing in each round until you reach a total of 48 stitches.
- Shape the Egg: Crochet several rounds without increasing to form the egg shape.
- Stuff and Close: Begin decreasing rounds to close the egg, stuffing it firmly as you go. Fasten off and weave in the ends.
Decorating the Egg
- Stripes and Dots: Use contrasting colors to crochet small stripes or dots. These can be sewn onto the egg or crocheted directly into the rounds.
- Embroidered Designs: Use embroidery floss to stitch patterns such as zigzags, flowers, or polka dots onto the surface of the egg.
- Bows and Ribbons: Add small bows or ribbons using thin yarn or ribbon material to enhance the festive look.
Tips for Success
Consistent Tension
Maintaining consistent tension is crucial for creating even stitches and a uniform appearance in your amigurumi pieces. Practice on a small swatch if needed.
Even Stuffing
Stuff your amigurumi evenly to avoid lumps and maintain shape. Use small amounts of fiberfill at a time and ensure it is distributed uniformly.
Personalization
Customize your bunnies and eggs with different colors, patterns, and accessories. Add small details like flowers, baskets, or even tiny chicks to enhance the Easter theme.
Conclusion
Making Easter amigurumi bunnies and decorated eggs is a fun and rewarding way to celebrate the holiday. These adorable handmade items can bring joy to your home decor, serve as charming gifts, or even become cherished keepsakes. By following this guide, you can create delightful Easter amigurumi that capture the spirit of the season and showcase your crochet skills.